Connecting Power to a 24 volt Telco Clock
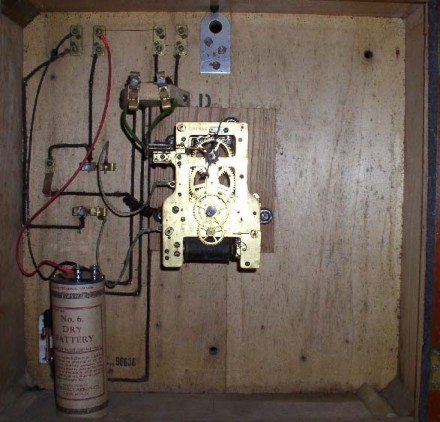
Below is a picture of a typical Self Winding Clock Co. 24 volt Telco parlor clock, taken with the dial removed. This particular clock does not have a synchronizer coil. Note that the upper movement terminal on the left, marked A, connects to the Fahenstock terminal C which connects to the manual winding switch. This is very important in order for the winding switch to work properly and MUST NOT be connected anywhere else. Movement terminal B connects to Fahenstock terminal D. Be sure that the black curled grounding wire, which connects to the winding switch, is in place. This is a good time to make sure that the contact areas of the winding switch are clean. If not, remove the switch and clean it with Scotch-Brite. Do not use Scotch-Brite near the movement since it will generate abrasive dust and you don’t want that getting into the movement.
The 24 volt DC battery or power source is then connected to terminals E and F. Polarity is not important. Again, be sure that these and all other terminals are clean and oxide- free. If they remain oxidized and dirty, you may experience intermittent connections. The remaining terminals and switches in the clock are not used. They were originally meant to provide the 6 second timing signals to the billing system or printer. Don’t connect batteries to these terminals or switches.

The next picture shows the wiring installed as described above, but in addition, also shows the Model 1900R-24V connected to the clock. Note that the black and red battery wires are connected to terminals E and F as described above.


The following are some close ups showing the battery and the terminal connections above:
